As presented in the article, “Why you should have bleed in a PDF file”, inadequate or missing bleed is a production complication that can have a negative impact on prepress and pressroom productivity since time and money can quickly be lost while waiting for updated files.
Starting with PitStop Pro version 13, users can now fix bleed issues related to both vector and raster objects. The new “Add Bleed” Action List uses a combination of methods to either reveal masked areas for bleed or mirror objects to ensure a document has sufficient bleed.
Start fixing bleed now
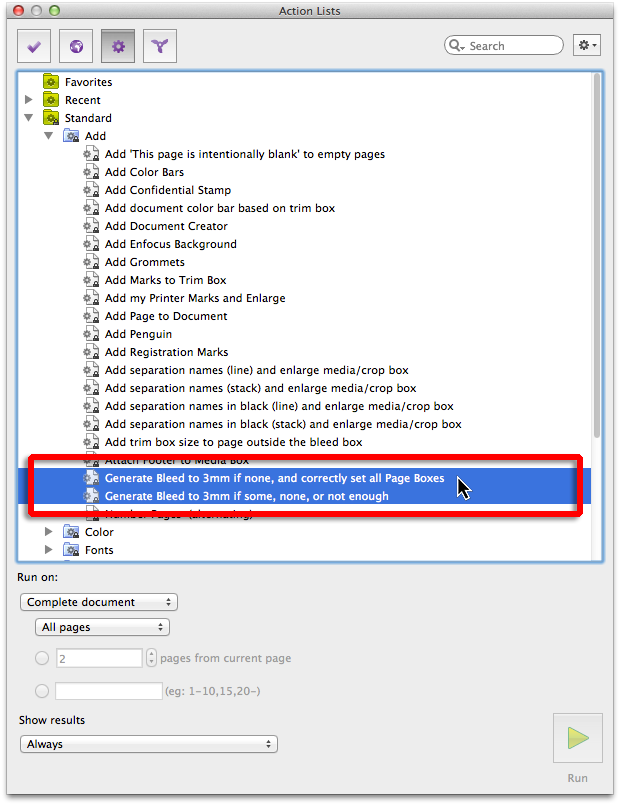
PitStop Pro ships with 2 default Action Lists that can correct bleed, quickly and easily.
Launch the Action List Panel and navigate to Standard > Add >
- Generate Bleed to 3mm if none, and correctly set all Page Boxes
- Generate Bleed to 3mm if some, none, or not enough

Depending on the incoming file, select whichever Action List best matches the content and select RUN and notice the newly added bleed.
How it works
Adding bleed requires 3 prerequisites:
- Properly defined Trim Box: typically the finished size of a given project.
- Suitably defined Bleed Box: the area beyond the Trim Box that should be filled to its edges with items intended to bleed. This size can vary based on vendor or even region and can range from 3mm, 1/8” or ¼”. This is how PitStop Pro “knows” just how much bleed to add.
- Adequate Media Box: The Media Box is the overall physical size of the PDF and should be large enough to include the Trim and Bleed boxes, plus room for any additional marks or color bars.
Use the PitStop Show Page Boxes view to see the various page boxes of a given file.

The first default Action List above will automatically adjust pages boxes (assuming that the Trim Box is correctly identified) prior to fixing the bleed. The 2nd default Action List requires that the Media Box is set correctly.
Method 1: Revealing Cropped Data
In some cases, PDF files may have adequate bleed that has been cropped to the Trim Box during the conversion to PDF.
Using PitStop Wireframe Mode can quickly show that information has been cropped to the Trim Box.


Running a default “Generate Bleed” Action List will release these Masks and expose this information for bleed.

Method 2: mirroring
More commonly, files are supplied with insufficient or missing bleed for which PitStop will use a mirroring technique to generate the missing bleed.
Again viewing a document in PitStop Wireframe will show that objects are not masked nor do they fully extend to the Bleed Box.

Running the “Generate Bleed” Action List will now make an exact, mirrored duplicate of the image that will now fill the bleed box. The Mirrored object is independent from the original but does retain the original color space.

In many cases, the Add Bleed Action List will produce an acceptable result, although it’s at the user’s discretion to approve the outcome. As with any file alteration, the results should be carefully screened for acceptability, as some results may appear more desirable than others.

Customizing bleed size
While the default Action Lists work with 3mm bleed, users can easily change this value by creating a Bleed Box that is different from 3mm (see more on working with Page Boxes in a future Blog Post) by whichever method is most familiar.

Once the Page Boxes are defined, create a “New” Action List and include the “Add Bleed” Action List only. When executed, PitStop recognizes the previously defined Bleed Box dimensions and will use the same combination of techniques to generate bleed.

Simply using the 2 default Generate Bleed Action Lists will quickly provide PitStop Pro users with even greater ability to manage problematic files and to keep production on schedule and on budget.


