Connect to the preferred database by configuring it in the ODBC data sources of the User Preferences dialog box (available only if you have licensed the Database module):
- In Switch, navigate to .
- Double click ODBC data source information property to open the ODBC data sources dialog box.
-
Click the + button to add and configure an ODBC data
source.
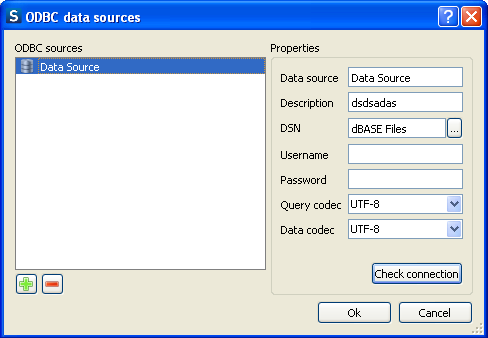
- In the Properties pane, provide a name for the data source in the Data Source textbox.
- Provide a small definition for the data source in the Description textbox.
-
Click this
 button to select the DSN (Database Source Name) from the library. The data
source name should be defined in the DSN settings of your operating system. For
more information on how to define your DSN settings, refer this http://msdn.microsoft.com/en-us/library/ms710252%28v=VS.85%29.aspx
website for MS Windows and this http://support.apple.com/kb/dl895 website for Mac OS X.
Switch allows you to use both User and System DSN on Windows and Mac
platforms.
button to select the DSN (Database Source Name) from the library. The data
source name should be defined in the DSN settings of your operating system. For
more information on how to define your DSN settings, refer this http://msdn.microsoft.com/en-us/library/ms710252%28v=VS.85%29.aspx
website for MS Windows and this http://support.apple.com/kb/dl895 website for Mac OS X.
Switch allows you to use both User and System DSN on Windows and Mac
platforms. While running Switch on a 64 bit Windows operating system, only 32 bit ODBC drivers can be used as Switch is currently a 32 bit process.
For example, in case of MySQL database the ODBC driver installer mysql-connector-odbc-5.1.8-winx64.msi is used. When you launch this installer and choose the Custom installation you will see that there are two drivers available: 32 bit and 64 bit. Here choose to install the 32 bit driver and preferably disable the 64 bit driver to avoid mix-up of driver versions in the future. This will guarantee that Switch uses the correct driver. Refer this http://msdn.microsoft.com/en-us/library/ms710285%28v=VS.85%29.aspx website for more information on ODBC drivers and data sources.
After installing the 32 bit driver, it is important to use the correct ODBC Administrator tool to configure your data sources (DSNs). On 64 bit Windows there are two ODBC Administrator tools available:- 32 bit version - ..\windows\sysWOW64\odbcad32.exe
- 64 bit version - ..\windows\system32\odbcad32.exe
Use the 32 bit version from \windows\sysWOW64\odbcad32.exe to configure your DSNs for Switch.
If you install only the 32 bit ODBC driver and then launch the 64 bit version of the tool then you will not be able to configure any DSNs. This is because 64 bit version of the tool does not show the 32 bit ODBC drivers.
If you have installed the 64 bit ODBC drivers, then in the 64 bit version of the tool you will see the 64 bit driver and you will be able to configure DSNs for that driver. However, Switch will not work with these DSNs and you will get the error message The specified DSN contains an architecture mismatch between the Driver and Application".
Therefore, always install 32 bit ODBC drivers and use the 32 bit version of the ODBC Administrator tool.
Note: The ODBC Administrator tool invoked from the Control Panel on Windows 64 bit OS will be a 64 bit tool. Do not use this tool to configure DSNs for Switch.Refer this http://msdn.microsoft.com/en-us/library/ms712362%28v=VS.85%29.aspx website for more information on managing data sources.
On Mac OS X too, the rule of using 32 bit ODBC driver for Switch is relevant because Switch is a 32 bit process on this platform too. For example, in the MySQL database there are two versions of Mac OS X ODBC drivers available: 32 bit and 64 bit. You need to use the 32 bit version (mysql-connector-odbc-5.1.8-osx10.6-x86-32bit.dmg).
- Provide a Username and Password. These two fields can also be left blank if a username and password is not required or if it has already been defined for the DSN.
- Select a Query codec and Data codec in the drop-down menus, if required.
-
Click Check connection button to test the database
connection.
On successful connection, a message box appears displaying the message
Connection successful.Note: When there is any problem while connecting to the database, the error message which is displayed is in fact generated by the ODBC tool of the operating system.
- Click Ok button in the message box as well as in the ODBC data sources dialog box. If you have more than one database, follow the steps explained above and add as many data sources as the number of databases.